What Is a DIY PC Soundbar and Why Build One?
A DIY PC soundbar is a custom-built audio speaker system designed specifically for your desktop computer setup. Unlike commercial soundbars, you assemble the components yourself, controlling every aspect of sound quality, size, and cost. Building one takes 4 to 8 hours and costs 40 to 60 percent less than equivalent retail products. You get better audio performance, learn audio engineering fundamentals, and end up with a soundbar perfectly matched to your workspace.
Gathering the Right Materials and Tools
Start with quality speaker drivers. You'll need a pair of full-range drivers (4 to 5 inches) and a tweeter for high frequencies. Purchase these from specialized audio component suppliers. A passive crossover network directs frequencies to the correct drivers. You'll also need MDF wood (medium-density fiberboard) for the enclosure, wood screws, wood glue, and acoustic foam for dampening.
Essential tools include a circular saw or table saw, drill, screwdriver set, measuring tape, and level. If you lack workshop access, consider reaching out to local service professionals who can help with woodworking. Many makerspaces and community workshops offer tool access for reasonable hourly rates.
Electrical components require careful selection. A quality amplifier rated between 20 to 50 watts handles most desktop setups. Choose one with Bluetooth connectivity for wireless audio input. Purchase speaker wire rated for your amplifier's power output. Quality audio cables reduce signal noise and improve clarity.
Building the Enclosure and Assembly Process
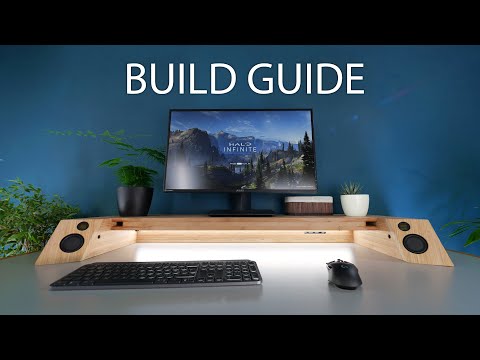
The enclosure design matters significantly. Start with a simple rectangular box measuring approximately 24 inches wide, 4 inches tall, and 4 inches deep. Cut your MDF boards to size using precise measurements. Improper dimensions affect acoustic response and sound quality.
Sand all surfaces smooth before assembly. Apply wood glue to joints and secure with screws spaced every 3 inches. Ensure the box is completely airtight. Any gaps leak sound and reduce bass response. Line the interior with acoustic foam or fiberglass insulation to dampen internal reflections and reduce resonance.
Mount the drivers carefully. Position full-range drivers toward the front center and position the tweeter above or beside them for balanced high-frequency distribution. Secure drivers with mounting rings and seal around edges with silicone caulk. Wire the crossover network between the amplifier and drivers according to component specifications.
Paint or finish the exterior for aesthetics. Use cable management solutions to keep wires organized and hidden. Test connections before final closure. Apply power gradually and listen for unusual noises, which indicate wiring errors or loose components.
Testing, Optimization, and Maintenance
Run your finished soundbar through a frequency sweep test using free audio software. Start at low volume and gradually increase. Listen for distortion, rattling, or uneven frequency response. Adjust enclosure dampening if you notice excessive bass resonance. Add more foam to problem areas.
Position the soundbar at ear level when seated. Angle drivers slightly upward for better high-frequency projection. Keep the soundbar at least 12 inches away from walls to minimize reflections. Test with music across multiple genres—classical, electronic, hip-hop, and rock reveal different sonic characteristics.
Maintain your DIY soundbar by keeping it dust-free and checking connections quarterly. Ensure the amplifier has proper ventilation to prevent overheating. If you encounter persistent audio issues, troubleshooting guides specific to your amplifier model help diagnose problems quickly.
Consider sharing your build journey online. Many audio enthusiasts document their projects, and some earn income through content creation. If you're interested in monetizing your expertise, programs like It's Buzzing's Ambassador Program connect creators with supportive communities and revenue opportunities.
Conclusion: Quality Audio on Your Terms
Building a DIY PC soundbar delivers superior sound quality compared to budget commercial options. You develop practical skills in woodworking, electrical assembly, and audio engineering. The finished product integrates seamlessly into your desktop setup while costing significantly less than retail alternatives. Start with quality components, follow specifications precisely, and invest time in testing. Your custom soundbar becomes a reliable audio solution for gaming, music, content creation, and everyday computing.