Direct Answer
Yes, I went to my old job and took apart their new 3D printer to learn more about its capabilities and potential applications.
Practical Section 1: Preparing for the Task
Before you start disassembling your 3D printer, it's essential to prepare for the task. This includes gathering the necessary tools and equipment, such as a screwdriver set, pliers, and a wrench. You should also ensure that you have a safe and stable workspace to avoid any accidents or damage to the printer. Additionally, consider consulting the user manual or online resources to understand the printer's design and components.
When selecting tools, look for a set that includes a variety of screwdrivers, pliers, and wrenches. A tool set from a reputable manufacturer like DeWalt or Craftsman can provide the necessary tools for the task. You may also need to purchase additional tools, such as a torque wrench or a precision screwdriver, depending on the specific requirements of the printer.
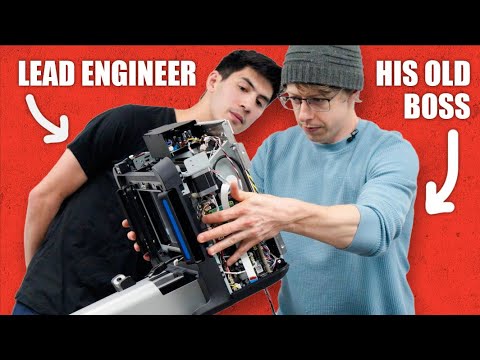
Practical Section 2: Disassembling the 3D Printer
Once you have prepared the necessary tools and equipment, it's time to start disassembling the 3D printer. Begin by removing the outer casing or cover to access the internal components. You may need to use a screwdriver or wrench to remove the screws or clips that hold the casing in place. Be careful not to damage any of the internal components or cables during the disassembly process.
As you disassemble the printer, take note of the different components and their functions. This can help you understand how the printer works and identify potential areas for improvement or customization. You may also want to take photos or videos of the disassembly process to reference later.
Practical Section 3: Reassembling and Testing the 3D Printer
After disassembling the 3D printer, it's time to reassemble it and test its functionality. Begin by reattaching the internal components and cables in the reverse order that you removed them. Make sure to secure all screws and clips firmly in place to avoid any damage or malfunction.
Once you have reassembled the printer, test its functionality by printing a simple object, such as a calibration cube or a small model. This can help you identify any issues or areas for improvement. You may also want to consult online resources or forums for troubleshooting tips and advice from other 3D printing enthusiasts.
When it comes to testing the 3D printer, consider visiting local businesses that offer 3D printing services, such as Local Services on It's Buzzing. These businesses can provide valuable insights and expertise on 3D printing and help you troubleshoot any issues with your printer.
Brief Conclusion
Disassembling and reassembling a 3D printer can be a rewarding and educational experience, especially for those interested in DIY 3D printing. By following the steps outlined in this article and consulting online resources, you can gain a deeper understanding of the printer's components and functions. Remember to always follow safety guidelines and best practices when working with 3D printers, and consider sharing your experience with others through the It's Buzzing Ambassador Program to earn extra income and promote your skills.